

In the age of the Internet, having an online merch store for your community, organization, or business is incredibly beneficial and important. If you are looking for a way to create an online store without paying any upfront costs or buying and storing any inventory – consider Bonfire! We make it super easy for you to create and launch a free online store to sell your custom merch.
If you’re new to Bonfire, or not sure where to get started, don’t worry – you’re in the right place! In this guide, you’ll learn how to create a store that looks great, matches your brand, and helps you sell more merchandise. Ready to get started?
We’ve put together everything you need to know to launch your very own Bonfire store!
Already know what you’re doing? Customize and launch your store for free on Bonfire.
Create an Account on Bonfire
All registered users on Bonfire can launch their own online apparel store. To start creating yours, all you have to do is sign into your account. If you don’t have an existing account with Bonfire – you’ll start by signing up! Once you are in your dashboard, you can navigate to the Store tab to begin.
Customize Your Store
There are many design choices you can make when designing your store. Here are some of our best tips to make your store look awesome and attractive to your buyers.
Name Your Store
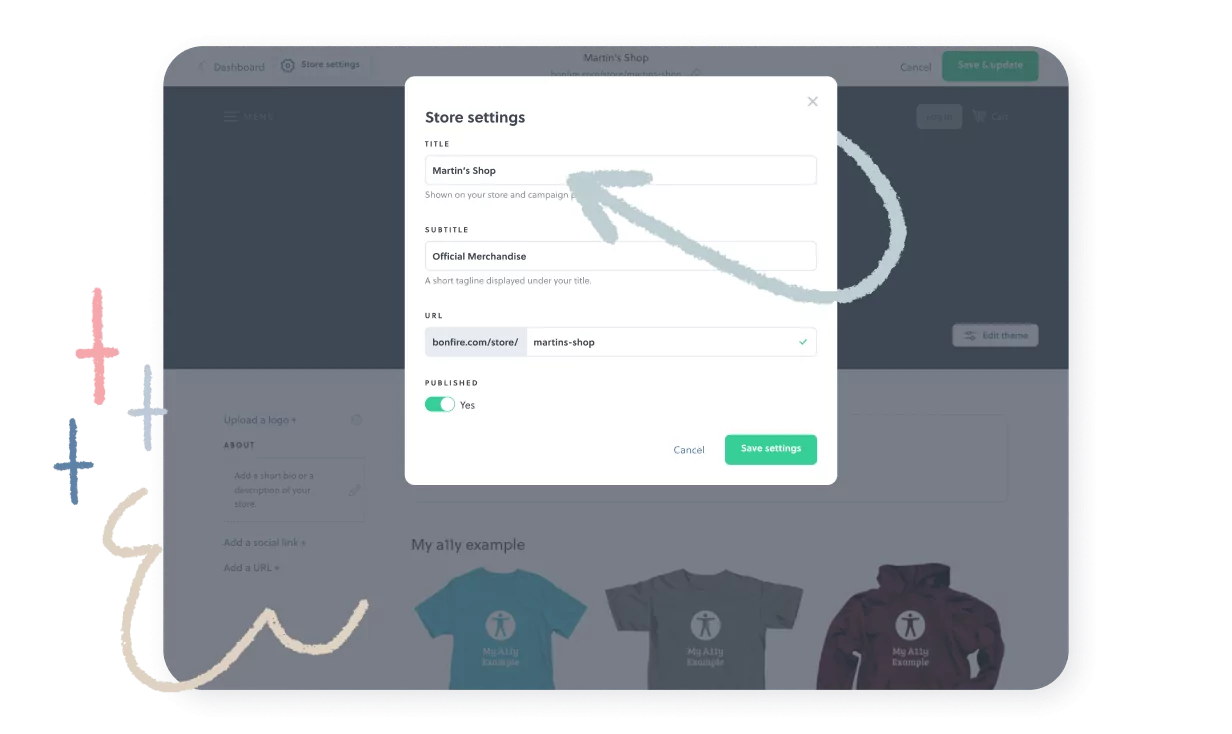
The first thing you’ll be prompted to do while creating your store is to decide on a store name. If you have a strong brand name already, we recommend continuing to use that as your store name to keep things consistent. If you are coming up with a name for the very first time, have fun with it, and also make sure it accurately represents your overall mission.
From this point on, when you are in Store Settings, the store name will be referred to as the store title. You will have the ability to change the store title, as well as the store subtitle (which shows up directly under the store title in your header), at any time. You can also toggle your subtitle on or off depending on if you would like to use it or not.
Helpful tip:
The title and subtitle of your store impact how your store will appear in search results on places like Google. What you enter in those fields is what will be displayed in search results. Use these fields to your advantage to promote your merch for your brand.
By default, we display “Official Merchandise” as the subtitle to help attract users’ eyes to your page in search results. We encourage you to get creative with your naming conventions.
Choose Your Header Layout
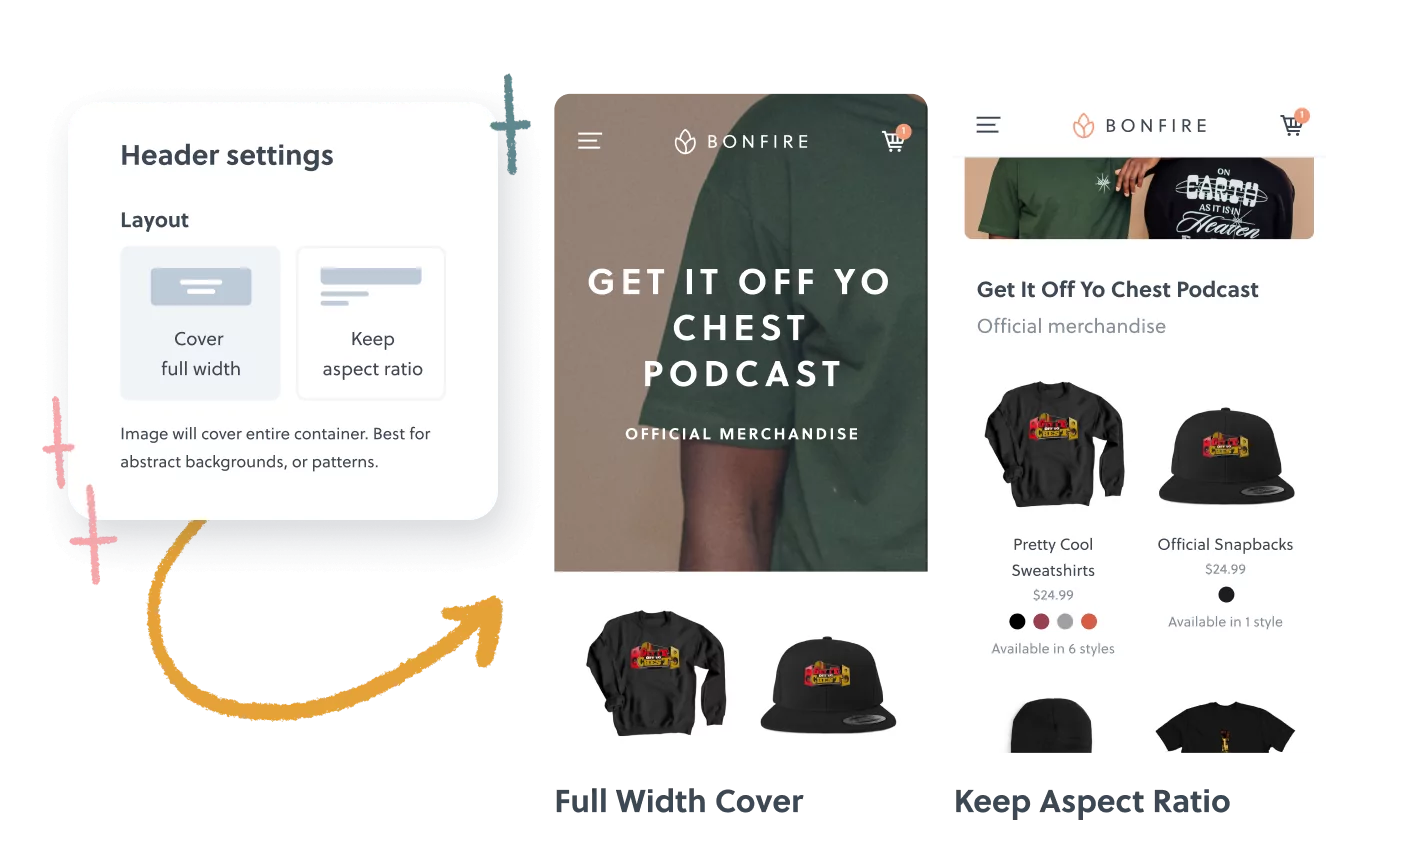
For the header, you can choose between two layouts: Cover Full Width and Keep Aspect Ratio.
Cover Full Width is the default header setting and displays your store’s header in full-size with your store name and subtitle displayed on top of the header image. If you select the Keep Aspect Ratio layout for your header, your store title & subtitle will be displayed underneath a condensed version of your header image.
The “Cover full width” option is best for abstract backgrounds or patterns. It also lets you overlay text on top of the banner. The “Keep aspect ratio” option will look exactly the same on all devices, so it’s recommended for images with text, or wide photos.
Design Your Header
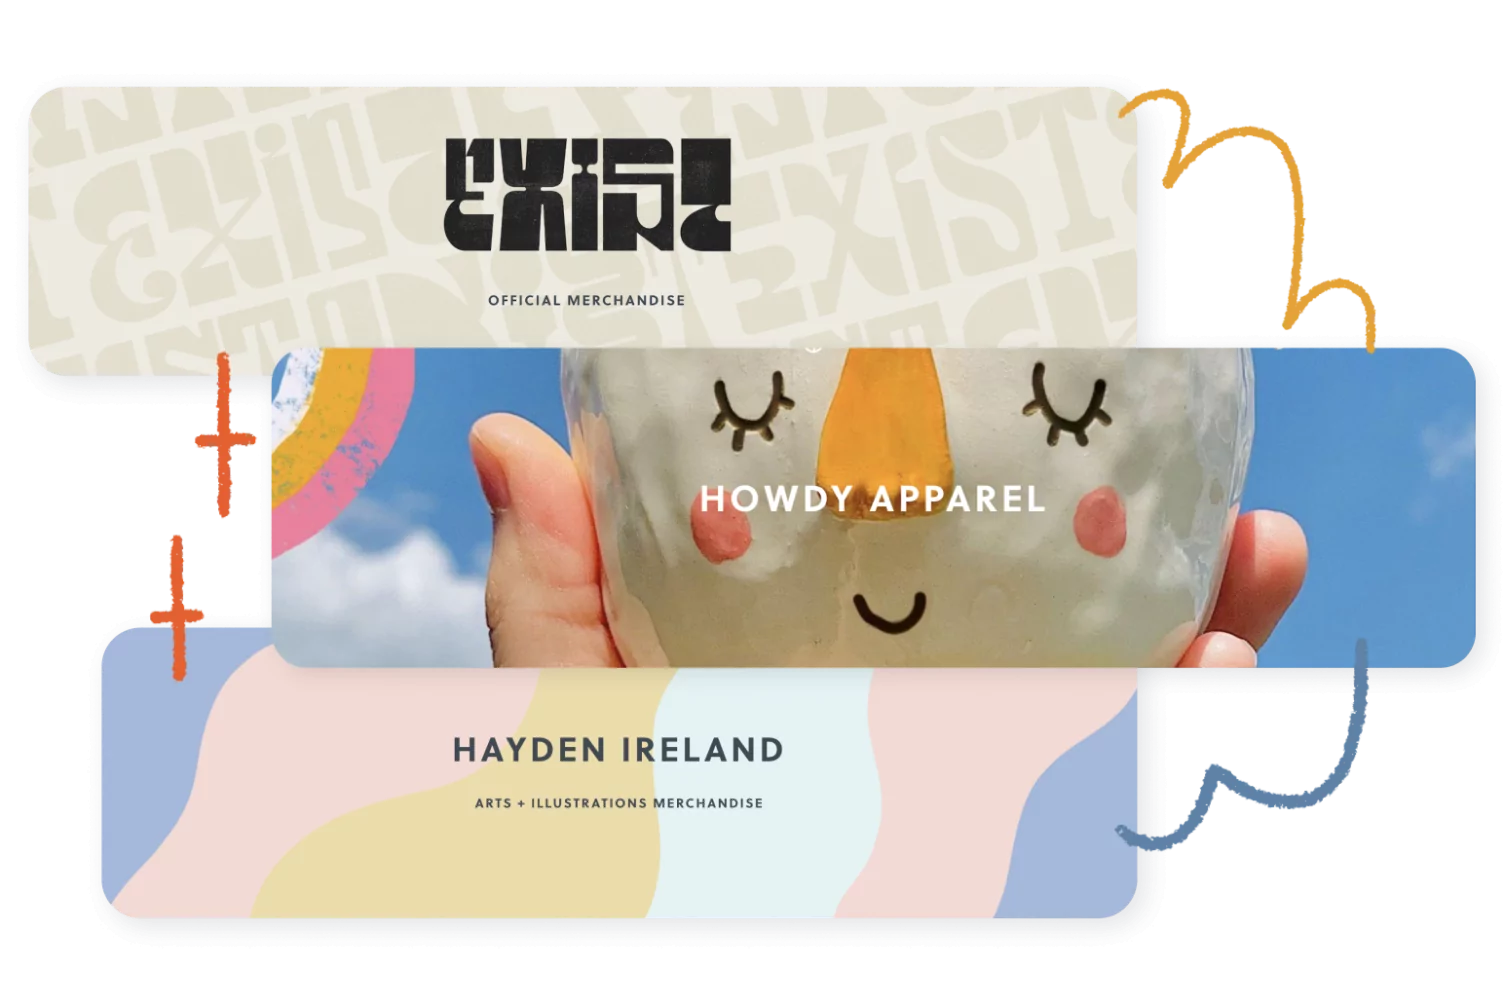
Be sure to give yourself ample time to make adjustments when designing your header. Your store header is the first thing your buyers will see when they land on your page, so it’s important to make sure it’s eye-catching and consistent with your brand. Here are a few things to keep in mind when you are creating your store header.
Add a Customized Background Image to Your Header
You can add a customized background image to your header. If you have access to your shirt’s artwork, you can incorporate it into the background to create a visually appealing, cohesive look.
If you don’t already have a header background image that represents your brand, you can check out unsplash.com to browse a large collection of high-quality photography that’s free to use. You might find the perfect photograph that helps tell the story of your business, nonprofit, or school.
To enhance the look of your header and the readability of your text, you can use the photo opacity slider to overlay a color on your image. Try different opacity levels and background colors to achieve your desired look.
Helpful tip:
Depending on which Header Layout you are using, different dimensions work better for your background header images.
For ‘cover full width’ we recommend using an image that is 2400px by 900px.
For ‘keep aspect ratio’ we recommend using an image that is 2688px by 600px.
Play Around With How You Use Photos and Text in Your Header
Pay attention when pairing a photo with overlaid text. If the best photo you have is busy and saturated with color, try to increase the color overlay to make sure the text can be read easily.
If you plan on adding text on top of your photo, you probably want to make sure the photo you are using doesn’t have any existing text on it. Adding text on top of text may make the wording illegible.
Avoid using dark text on dark images, or light text on light images. This can make it difficult for your buyers to see the title of your store, which would be a big bummer. Contrast works best in this scenario! Try using darker text on a lighter image, or lighter text on a darker image.
Use an Image Instead of Text for Your Header
When it comes to how you would like to display your store title, you have three different options: text, image, or ‘off’ (hidden). If you have an established brand or want more customized control over your header and store title, you can select ‘image’ and upload the image you would like to use in place of text. This is a great opportunity to showcase and express your unique aesthetic.
Customize the Sidebar
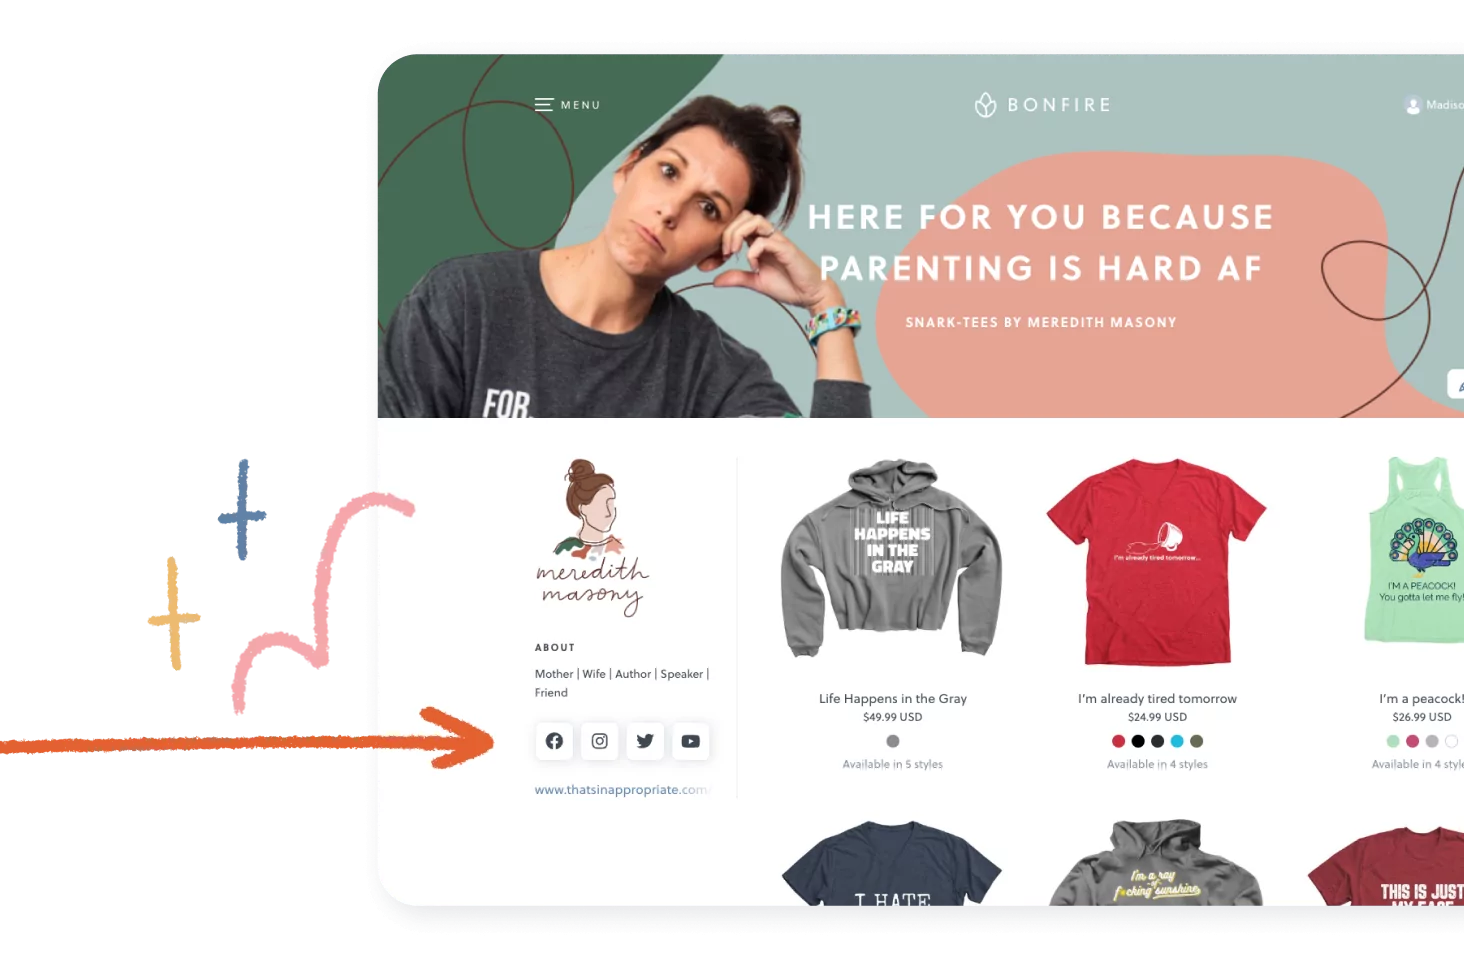
Once your header is looking sharp, take a look at the store sidebar if you have one. A great first step is to upload your logo to the sidebar. Keep in mind that this logo will also show on any campaign page that is added to the store. Logos on a white background look best.
In the sidebar, you can add a short bio about you, your organization, or your business. There’s also a place where you can link to your social media accounts and website. The sidebar helps visitors know they are in the right place, and also helps them learn more about you, and where else they can find you.
Add a Secondary Title

Scroll to the bottom of the store page to add a secondary title or a long description. This is a great place to dive deeper into the meaning of your campaigns or organization.
Choose a Color Theme
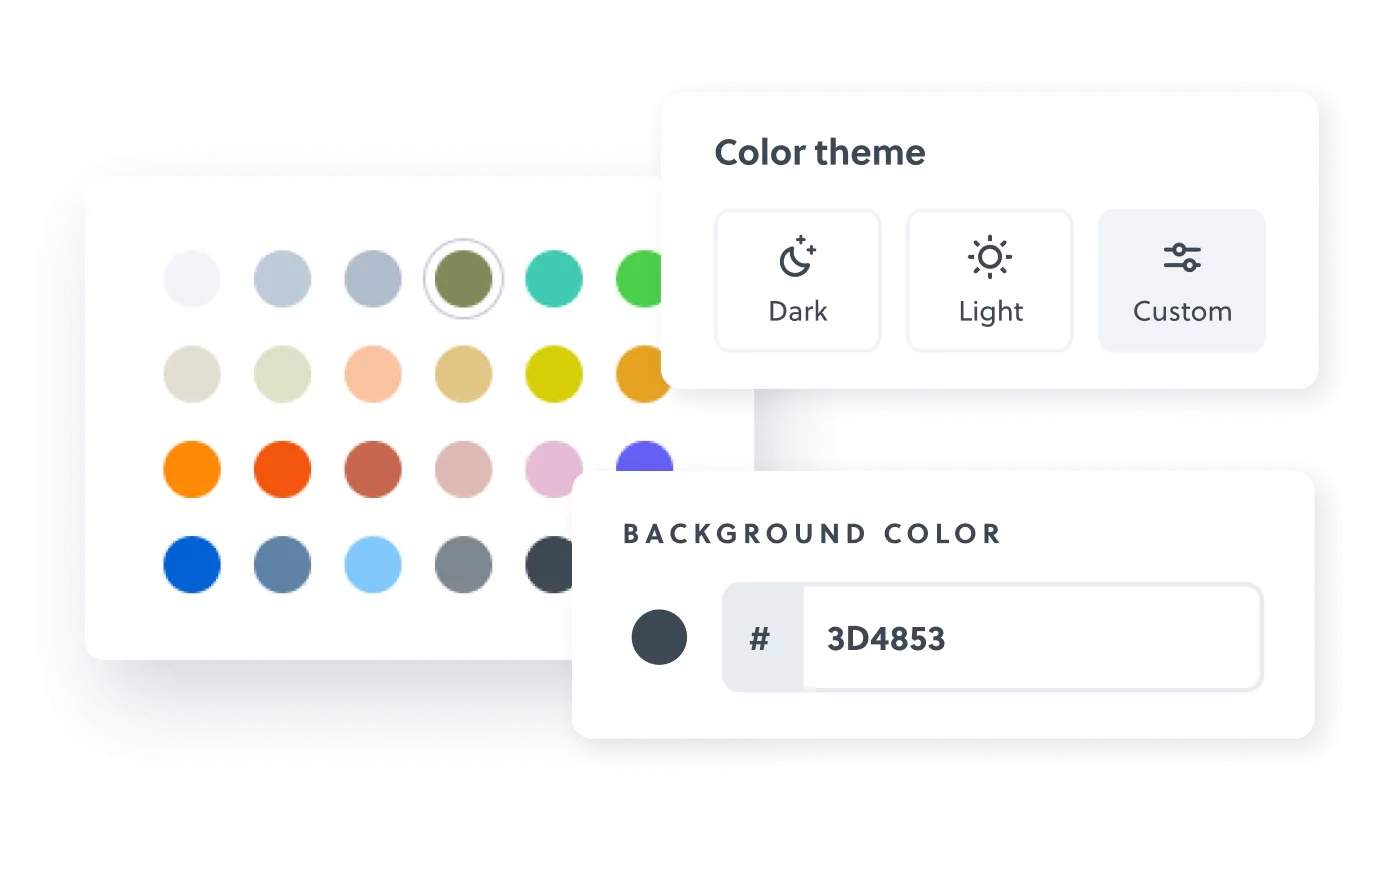
You can choose between three preset color themes in header settings: dark, light and custom. The dark theme is selected by default, but we encourage you to preview all three color themes to see which one is right for you.
If you want more freedom to customize your store, or want to match your brand more closely, you can choose the custom theme — where you are also able to select the header overlay color. Use one of our color presets, or enter your own hex code in the input next to it. Play around with the different settings until you find something that looks like your brand.
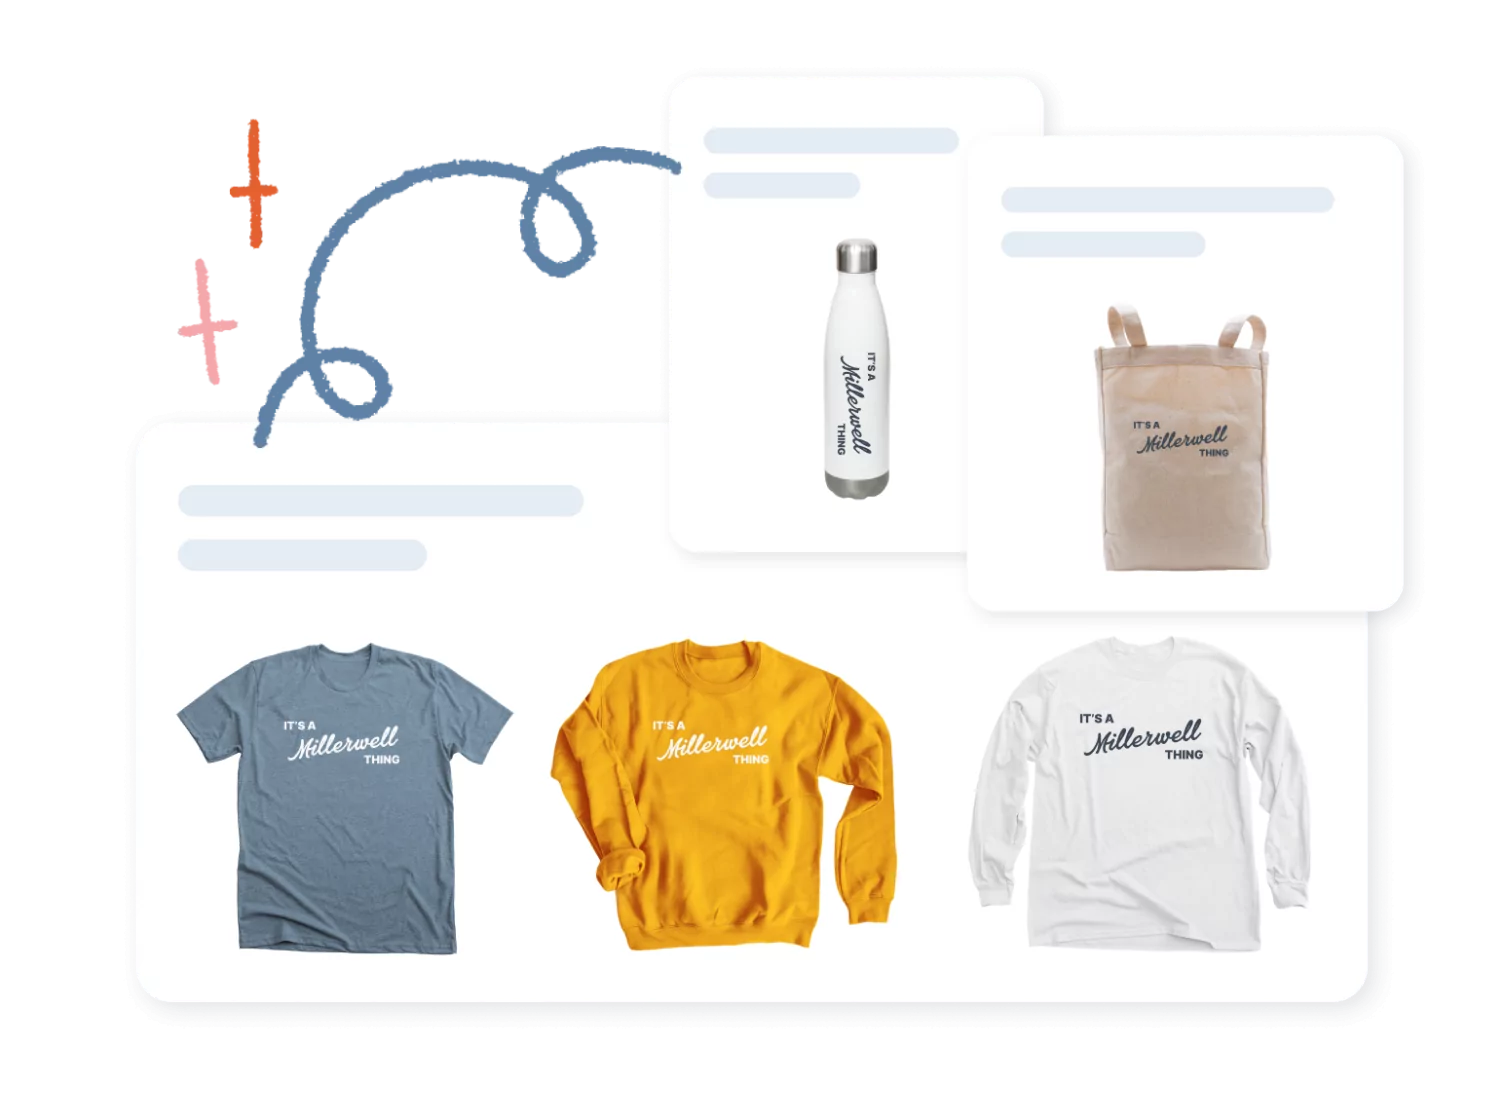
Each design you sell in your store is a different Bonfire campaign. These campaigns will be featured in your store. There are tons of incredible merch options to choose from to offer in your campaigns. From t-shirts to sweatshirts to tote bags – the possibilities feel practically endless!
When creating each campaign, you’ll be prompted to select products to offer for each design. Sift through our product catalog and choose your favorites!
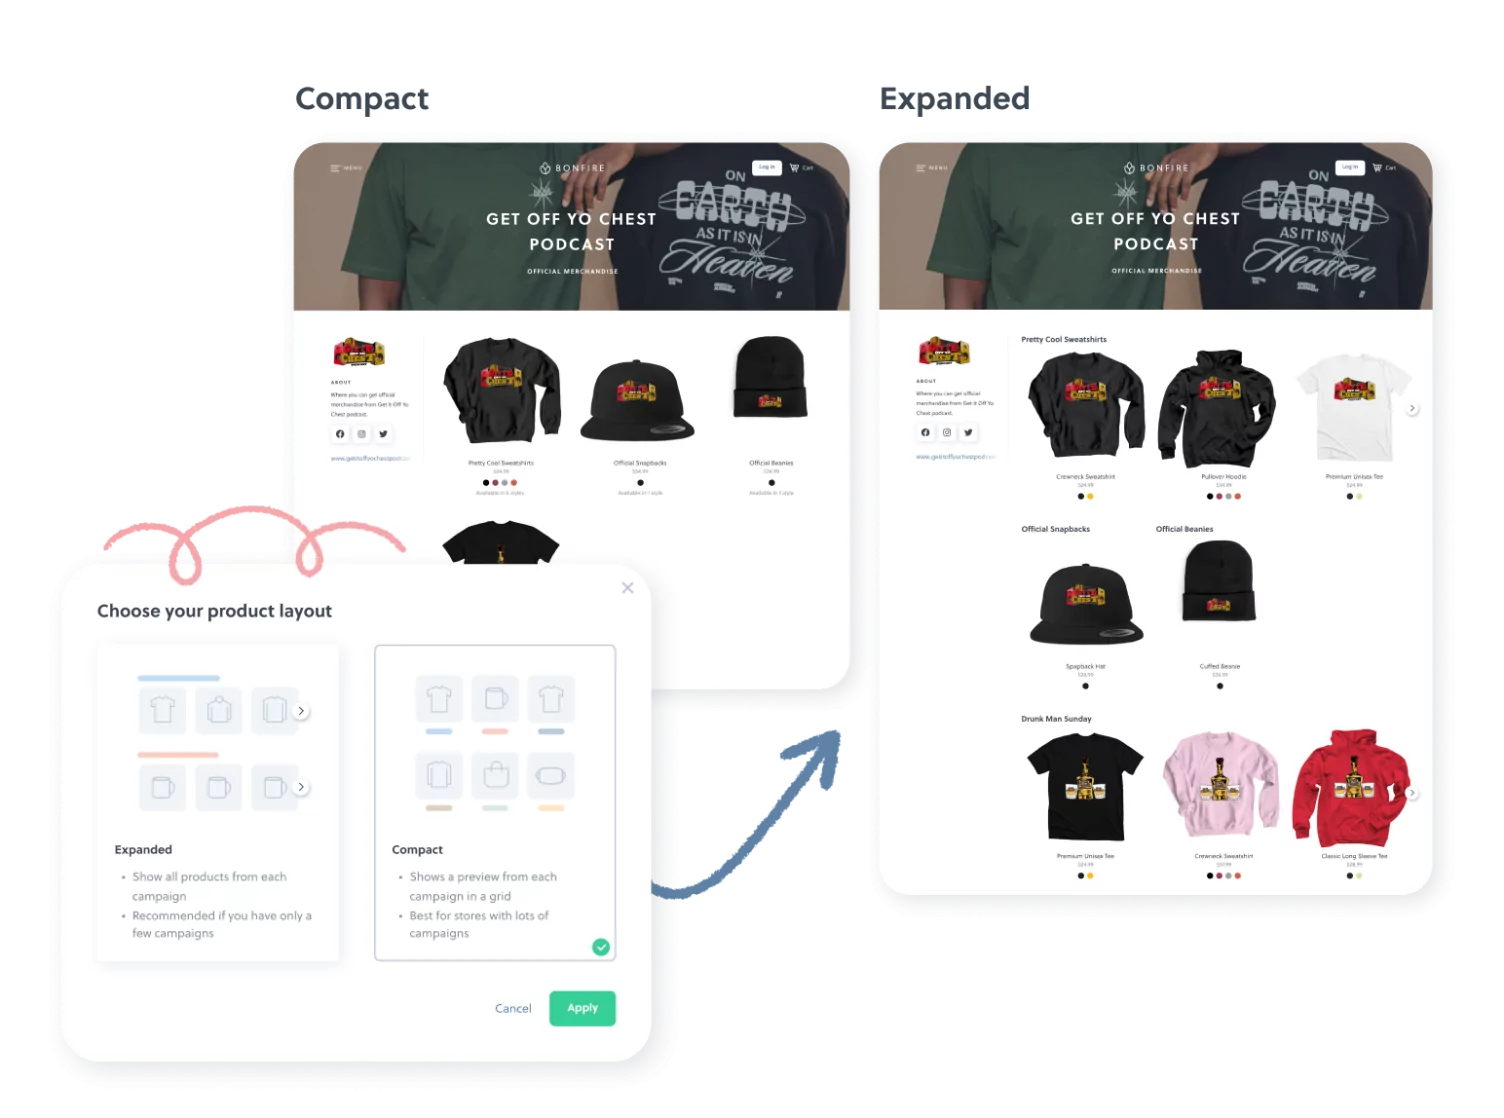
Choose Your Product Layout
For products, you can choose between two layouts as well: Expanded or Compact.
By default, when you add a campaign to your store, all of the product styles within that campaign will be visible. This is called the “expanded view.”
In the minimized view, the text will be placed below the product advising customers how many other styles are available.
Choose the Type of Campaigns to Show
There are two different campaign options to choose from that determine the length of time that your products will be available: On-Demand Campaigns and Limited Edition Campaigns.
On-Demand Campaigns
In order to have a robust store for your community, you’ll likely want to have a campaign or two in your store that’s always available for purchase. This design could be based on your logo or something else that you’d want to keep selling all year long. If you turn the smart launch feature on, On Demand campaigns renew automatically.
Limited Edition Options
It can also be helpful from a marketing perspective to sell short-run products that are available for a limited time in your store, too. This could be a great option for shirts that are meant for a certain event, holiday, or season.
Having a mix of both On-Demand and Limited Edition merch options can be an easy way to ensure your buyers can purchase the products they are looking for, but also encourage extra purchases too. For instance, if a buyer comes to your store looking for a Limited Edition shirt, they might add an On-Demand tote bag to their cart when they see it being promoted in your store.
Helpful tip:
Keep in mind, that your store doesn’t have to feature every single campaign you’ve done with Bonfire. You can pick and choose which campaigns are in your store. This is something you can change over time as well, as your marketing or fundraising strategies shift.
Change the Featured Product Image
Choosing a featured product to represent each campaign is helpful when it comes to showcasing multiple campaigns in your store.
To change a campaign’s featured image in your store, open the campaign page and click the ‘Edit Campaign’ button in the top right. Once in edit mode, navigate to the ‘Edit & Preview’ tab. You can choose the product style, color, and front or back orientation you would like to feature.
Click ‘Set as Featured Product’ to determine which item will be the Featured Product for each campaign. Hit ‘Save’ to update.
Helpful tip: Selecting specific colors for your featured products allows you to customize how each thumbnail looks for all your product styles when your store is using the ‘expanded layout’.
Change the Order of Your Campaigns
You can decide the order for how your campaigns are displayed in your store.
Once your store contains two or more campaigns, you can reorder them to your liking. Simply hover over the top right of a campaign and the reorder icon will appear.
Publish and Promote Your Store
Once you’ve taken the time to build out your store and product offerings, and you’ve got it all just right – it’s time to publish your store! This will make it visible to everyone, and ready for you to start sharing with your community.
Link to Your Store on Social Media
Using simple links that prioritize the user experience will make it easy for your followers to directly access your merch store. We recommend using a link-in bio tool like Linktree so you can link to your profile across all of your platforms.
Bonfire has partnered with Linktree on an integration that allows your community to shop your top campaigns or even visit your full store without ever leaving your profile!
Use this integration to create a seamless buying experience across all your platforms – Instagram, TikTok, YouTube, Twitter, etc.
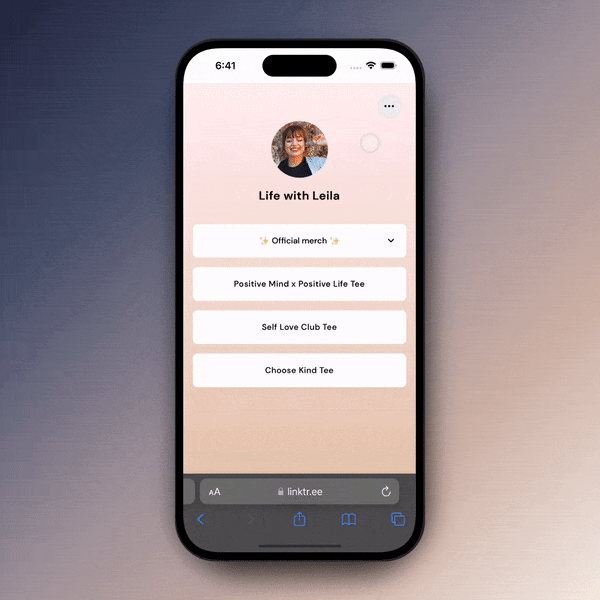
Once you’ve set up your Linktree integration, add your unique Linktree URL to all of your bios, and be sure to tell your community to visit your “link in bio” to check out your Bonfire store!
Helpful tip:
To learn how to manage your Linktree integration, check out this article.
Creating a store on Bonfire is easy, risk-free, and costs nothing to launch. If you’ve been looking for a better way to run a store for your nonprofit, brand, business, or project, this is the way to do it. You can test out merch ideas to see what is most popular, without the risk of having to print, store, and ship your own inventory. Bonfire takes care of the whole process for you – from creation to fulfillment. Let’s get started on your Bonfire store today!
If you have questions about creating or customizing your store, feel free to reach out — our Support Team is standing by and ready to help.
Create an online store on Bonfire to show off all of your amazing merch!

Written by: Hayden Ireland / Content Specialist
Illustrated by: Madison Summers / Lead Marketing Designer


